
🧱Hey Revit Rockstars and aspiring BIM builders! Ever feel like designing in Revit can be a bit… flat? Well, get ready to add some serious dimension to your projects because today, we’re diving deep into the wonderful world of Stacked Walls!
Think of a standard wall in Revit as a single, glorious LEGO brick. It’s fundamental, it has its purpose, but sometimes you need something a little more complex, a little more… layered. That’s where stacked walls come in, allowing you to combine different wall types vertically to create a single, powerful element.
Just like meticulously piecing together your favorite LEGO castle, building stacked walls in Revit is all about understanding the individual components and how they fit together. So, grab your digital bricks, and let’s get stacking!
Step 1: Gathering Your Bricks – Defining Your Wall Types
Before you can build your stacked masterpiece, you need your individual wall types – your LEGO bricks! These are your standard Revit walls, each with its own unique construction, materials, and thickness.
What to Expect: This is where your understanding of building assemblies comes into play. You might already have the wall types you need in your template. If not, you’ll need to create them first. Think about the different layers your wall will have: a foundation wall at the bottom, perhaps a brick veneer in the middle, and a different interior finish at the top. Each of these needs to be a defined wall type in Revit.
LEGO Analogy: Imagine sorting through your LEGO bin. You’ll need the specific bricks you want for each section of your creation – maybe some sturdy Duplo blocks for the base and some smoother, colorful bricks for the upper levels.
Step 2: The Foundation – Creating the Stacked Wall Type
Now that you have your individual “bricks,” it’s time to define the “stacked” structure itself.
- Go to the Architecture tab, then click the Wall dropdown and select Wall: Architectural.
- In the Properties palette, under Type Selector, find a stacked wall type (it might be called “Stacked Wall” by default).
- Don’t start drawing yet! Instead, click Edit Type in the Properties palette.
- In the Type Properties dialog, click Duplicate and give your new stacked wall type a descriptive name (e.g., “Brick Veneer on Concrete Foundation”).
- Now, click the Edit… button next to the Structure parameter. This opens the Stacked Walls dialog.
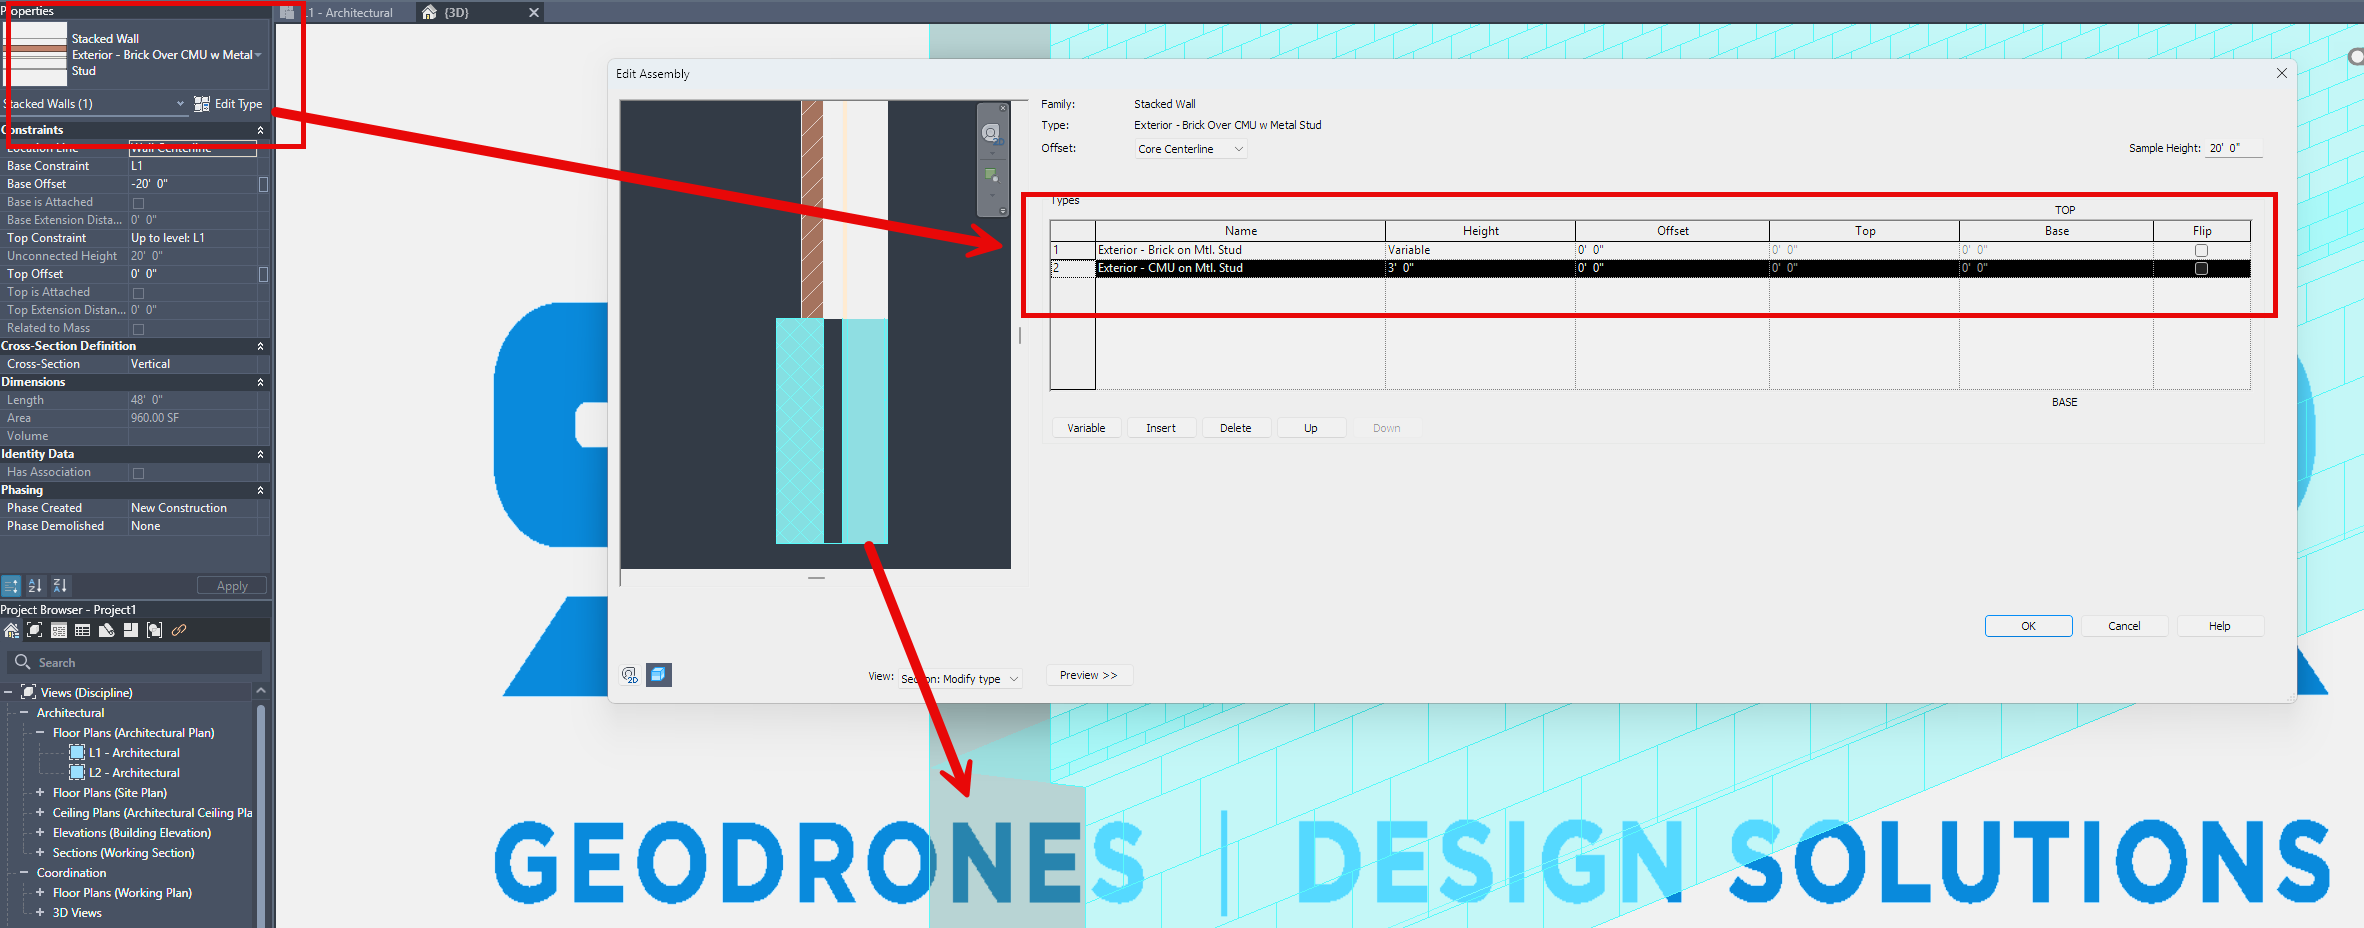
What to Expect: This dialog box is your stacking playground! You’ll see a list (initially empty or with a default component). Here’s what you can do:
- Insert: Click this to add a new layer to your stacked wall. A new row will appear.
- Delete: Select a layer and click this to remove it.
- Up/Down: Use these arrows to reorder the layers in your stack. The order here determines the vertical arrangement in your model.
- Wall Type: This is where you choose the individual wall types you defined in Step 1. Use the dropdown to select the desired “brick” for that layer.
- Offset: This allows you to vertically offset a specific layer from the top or bottom of the layer below it. This can be useful for reveals or other design details.
- Variable: Check this box for one of your wall layers if you want its height to be flexible when you adjust the overall height of the stacked wall. Typically, your main wall component (like the framing) will be variable.
LEGO Analogy: This step is like taking your sorted LEGO bricks and starting to connect them vertically. You decide which brick goes on the bottom, which goes next, and so on. The “Offset” is like deliberately leaving a gap or having one brick slightly overhang another for a specific visual effect. The “Variable” brick is like a section of your LEGO creation that can expand or contract in height as needed.
Step 3: Stacking Them High – Placing Your Stacked Wall

With your stacked wall type defined, you can now place it in your Revit model just like any other wall!
- Make sure your newly created stacked wall type is selected in the Type Selector.
- Choose your desired Location Line (Wall Centerline, Core Centerline, etc.) and drawing options.
- Click and drag in your view to draw the stacked wall.
What to Expect: As you draw, you’ll see your different wall layers stacking up exactly as you defined them in the Stacked Walls dialog. The overall thickness will be the sum of the thicknesses of your individual wall types (unless you’ve used offsets). If you have a “Variable” layer, its height will adjust to meet the top and bottom constraints you set for the stacked wall.
LEGO Analogy: This is the exciting part where you see your planned LEGO structure come to life in your model! Each layer you defined snaps into place, creating a more complex and visually interesting wall.
Step 4: Fine-Tuning Your Stack – Adjusting and Adapting

The beauty of Revit is its flexibility. You’re not stuck with your initial stack!
What to Expect:
- Instance Properties: When you select a stacked wall, you can adjust its overall Base Constraint, Base Offset, Top Constraint, and Top Offset in the Properties palette, just like any other wall.
- Type Properties (Again!): If you need to change the order of the layers, add or remove layers, or adjust offsets within the stacked wall type, simply go back to Edit Type and modify the Structure. These changes will apply to all instances of that stacked wall type in your project.
- Splitting Walls: You can use the Split Element (SL) tool to divide a stacked wall horizontally. This allows you to have different wall compositions on different parts of the same vertical run. For example, you might have a brick foundation transitioning to siding on the upper level.
- Attaching Top/Base: Stacked walls can be attached to roofs, floors, or other elements, and their individual components will adjust accordingly based on the attachment options.
LEGO Analogy: Maybe you realize your LEGO castle needs a taller tower. You can easily add more layers (bricks) to your stacked wall type. Or perhaps you want a different facade on one section; you can “split” your stacked wall and assign a different stacked wall type to that portion.
Building Beyond the Basics 🧱
Stacked walls are a fantastic tool for representing complex wall assemblies accurately and efficiently. They save you from having to draw multiple individual walls and carefully align them.
Creative Uses:
- Foundations: Easily model foundation walls with different materials below and above grade.
- Panelized Systems: Represent pre-fabricated wall panels with integrated insulation and finishes.
- Curtain Wall Transitions: Create seamless transitions between standard walls and curtain wall systems.
- Decorative Features: Incorporate baseboards, wainscoting, or other decorative elements as part of a stacked wall.
So, the next time you’re facing a multi-layered wall in your Revit project, remember your LEGOs! With a little planning and understanding of the stacking process, you can build complex and accurate walls with ease, bringing a whole new dimension to your BIM creations right here in St. Louis, Missouri, or anywhere your Revit adventures take you! Happy stacking!
![]()
Leave A Comment