
In the fast-paced world of construction, managing project documentation efficiently is paramount. Autodesk Construction Cloud (ACC) provides powerful tools for this, but manually updating sheets can be a time-consuming and error-prone process. Imagine a world where your ACC sheets update themselves, reflecting the latest data from your everyday tools like Excel or SQL databases. This isn’t a dream; it’s achievable with Power Automate and the Autodesk Data Exchange Connector.
This guide outlines the conceptual steps and considerations for creating a Power Automate flow to update sheets within an Autodesk Construction Cloud (ACC) project using the Data Exchange Connector.
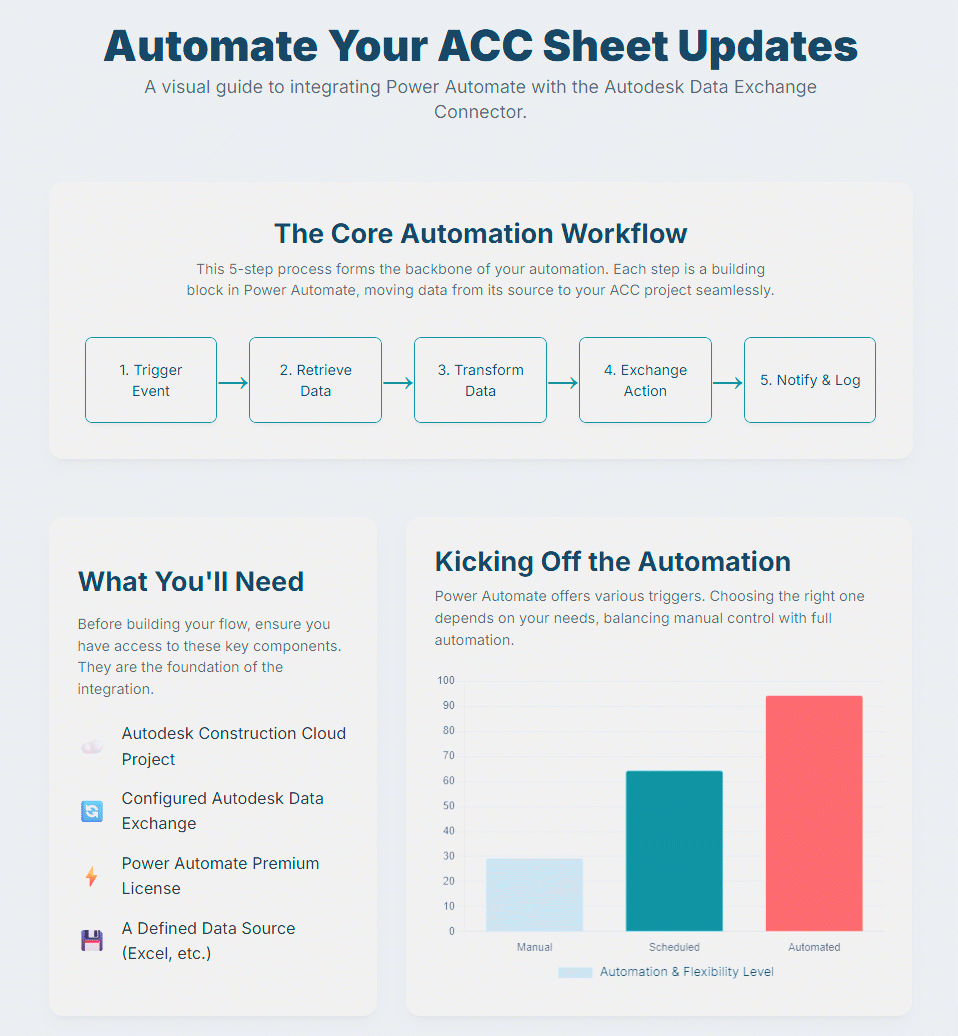
Understanding the Process
Updating sheets in ACC typically involves managing sheet versions, metadata, and potentially the underlying files. The Power Automate Connector for Data Exchange provides a way to interact with ACC data, but its specific capabilities for sheet updates (as opposed to general data exchange) need to be understood.
The general flow will look something like this:
- Trigger: An event occurs that signals the need for a sheet update (e.g., a new row in an Excel file, a change in a database, a scheduled time).
- Data Retrieval: Power Automate fetches the updated sheet data from its source (e.g., Excel, SharePoint List, SQL Database).
- Data Transformation: The retrieved data is formatted to match the requirements of the Autodesk Data Exchange.
- Data Exchange Action: Power Automate uses the Data Exchange Connector to push the updated information to the specified ACC project.
- Error Handling & Notifications: The flow handles potential errors and notifies relevant users of success or failure.
Prerequisites
Before you begin, ensure you have:
- Autodesk Construction Cloud Project: Access to the ACC project where you want to update sheets.
- Autodesk Data Exchange: Configured and set up within your ACC account, with appropriate permissions.
- Power Automate License: A valid Power Automate license that supports premium connectors.
- Data Source: The source of your sheet update data (e.g., an Excel file on OneDrive/SharePoint, a SQL database, a custom application).
- Understanding of ACC Sheet Management: Familiarity with how sheets are managed, versioned, and published in ACC.
Step-by-Step Guide in Power Automate
Here’s a conceptual breakdown of the Power Automate flow:
1. Choose Your Trigger
The first step in any Power Automate flow is defining what kicks it off. You have several flexible options:
- Manual Trigger: Perfect for initial testing or one-off updates. Simply select
Manually trigger a flow. - Scheduled Trigger: For regular, automated updates, use the
Recurrencetrigger and set your desired frequency (daily, weekly, etc.). - Automated Trigger: For real-time updates based on data changes:
When a row is added, modified or deleted(for Excel in OneDrive/SharePoint)When an item is created or modified(for SharePoint List)When a row is added, modified or deleted(for SQL Server, Dataverse, etc.)When an HTTP request is received(for integration with external systems)
2. Retrieve Sheet Data
This step is highly dependent on where your sheet data resides. Power Automate offers robust connectors for various data sources:
- For Excel (on OneDrive/SharePoint): Use the
List rows present in a tableaction from the Excel Online (Business) connector. Remember to specify the file location and table name. - For SharePoint List: Utilize the
Get itemsaction from the SharePoint connector, providing the site address and list name. - For SQL Server: Use the
Get rowsaction from the SQL Server connector, specifying the server, database, and table.
Important: Always identify a unique identifier for each sheet in your data source that directly corresponds to a sheet in ACC (e.g., Sheet Number, Title). This ensures accurate mapping.
3. Prepare Data for Data Exchange
The Autodesk Data Exchange Connector expects data in a specific, structured format. You’ll likely need to transform your retrieved data to match this requirement.
- Loop through data: Employ an
Apply to eachcontrol to process each row or item fetched from your data source. - Compose Action: Within the loop, use
Composeactions to construct the data structure required by the Data Exchange Connector. This involves mapping your source columns to the Data Exchange’s expected fields.- Example (Conceptual): If you’re updating sheet names or statuses, you’ll map your source data’s “New Sheet Name” to the Data Exchange’s “Sheet Title” field, and so on.
4. Use the Autodesk Data Exchange Connector
This is the heart of the automation, where Power Automate interacts directly with ACC. The specific action you choose will depend on the nature of your “sheet update”:
Create a Data Exchange: This is typically used to initiate a new data exchange. If your “update” involves pushing a new version of a data exchange that contains updated sheet information, this might be relevant.Update a Data Exchange(or similar): If the connector offers an action specifically designed to update an existing data exchange with new content, this is your ideal choice.Publish a Data Exchange: After creating or updating the data, you might need to explicitly publish it for the changes to take effect in ACC.
Key considerations for the Data Exchange action:
- Hub ID: Your Autodesk Construction Cloud Hub ID.
- Project ID: The specific ACC project ID.
- Data Exchange Name/ID: The name or unique identifier of the Data Exchange you wish to interact with.
- Data Payload: This is crucial. You’ll need to provide the data in the exact format expected by the Data Exchange. This often involves a JSON structure that represents the sheet information you want to update, adhering to the Data Exchange schema you’ve defined in ACC.
What if the Data Exchange Connector doesn’t directly support “sheet updates” as you envision?
In some advanced scenarios, the Data Exchange Connector might not offer the granular control needed for specific sheet updates. In such cases, you might need to explore using the HTTP connector to make direct API calls to the Autodesk Forge APIs (specifically the BIM 360/ACC Docs API or the Data Management API). This is more complex and requires:
- Forge App: Creating a Forge app and obtaining a client ID and secret.
- Authentication: Implementing OAuth 2.0 authentication within Power Automate to get an access token.
- API Endpoints: Identifying the specific Forge API endpoints for updating sheet metadata or uploading new sheet versions.
- Example:
POST projects/:project_id/folders/:folder_id/versionsto upload a new version of a file (which would be your updated sheet PDF/DWG). - Example: Patching sheet attributes.
- Example:
5. Error Handling and Notifications
A robust automation flow isn’t complete without proper error handling and notifications.
Configure run after: For each critical action, configure its “Run after” settings to define paths for both success and failure.Try-Catch(Scope actions): Group related actions withinScopeblocks to implement effective try-catch logic, isolating potential issues.- Notifications: Keep stakeholders informed:
Send an email (V2)(Office 365 Outlook connector)Post a message(Microsoft Teams connector)- Always include details about the success or failure, including any relevant error messages.
Example Data Structure (Conceptual for Data Exchange)
The precise JSON payload for the Data Exchange will depend on how your Data Exchange is configured in ACC. However, if you’re updating attributes, it might look something like this:
[
  {
    "sheetNumber": "A101",
    "newTitle": "Updated Floor Plan - Level 1",
    "status": "Approved",
    "revision": "Rev B"
  },
  {
    "sheetNumber": "A102",
    "newTitle": "Updated Ceiling Plan - Level 1",
    "status": "In Review",
    "revision": "Rev A"
  }
]
You would dynamically build this JSON array using Select and Compose actions in Power Automate based on your retrieved data.
Important Considerations
As you embark on automating your ACC sheet updates, keep these critical points in mind:
- Permissions: Ensure the Power Automate connection to Autodesk Construction Cloud has the necessary permissions to read and write to the target project and Data Exchange.
- Versioning: Understand how ACC handles sheet updates. Does updating a sheet create a new version, or does it overwrite existing metadata? The Data Exchange connector’s behavior in this regard is key to maintaining your document history.
- File Updates vs. Metadata Updates: Clarify whether you intend to update the actual sheet file (e.g., a new PDF) or just its metadata (e.g., sheet name, revision, status). The Data Exchange Connector is primarily for structured data, not necessarily for direct file uploads. For file uploads, you’d likely need to use the Forge APIs directly via the HTTP connector.
- Data Consistency: Ensure your source data is clean and consistent to avoid errors during the update process. Garbage in, garbage out!
- Throttling Limits: Be aware of any API rate limits imposed by Autodesk Forge or Power Automate to prevent your flows from being throttled.
Conclusion
Automating ACC sheet updates with Power Automate and the Data Exchange Connector offers a significant leap forward in project efficiency and data accuracy. While this guide provides a conceptual framework, the real power lies in tailoring these steps to your specific project needs and data sources. Dive into the specifics, experiment, and unlock a new level of automation for your construction workflows. Happy automating!
Feel free to reach out with any questions that you might have.
![]()
Leave A Comment