
When it comes to survey tasks, there is nothing quite as tedious as writing legal descriptions. A legal description represents the meticulous documentation of dimensions that define a property boundary. Since a legal description defines the “legally recognized” limits of a property, it MUST be free of errors.
This is where the tedious part comes in…
Writing a legal description usually involves checking, and re-checking (and checking again!) the measured bearings and distances in a CAD drawing against the measurements written in the description. Fortunately, Civil 3D makes it easy to extract property measurements into a “legal description format” such that they can be copy/pasted into your favorite text editor.
Let’s take a look…
Below is some geometry that represents a closed property boundary…
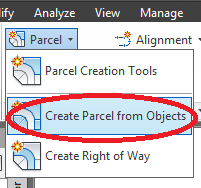
We’ll start by converting these entities into a parcel. To do that, visit the Create Design Panel, open the Parcel menu and select “Create Parcel from Objects”. Then, using a crossing selection, select the geometry on screen and press Enter.
In the Create Parcel from Objects dialog box, accept the defaults for site, parcel style and area label style. In addition, select “Automatically Add Segment Labels” and accept the label style defaults. (Note: Available styles will depend on the template you are using. If desired, select styles that match your office standards.) When finished, click OK.


Now that the geometry has been converted into a parcel, its dimensions can easily be extracted using a report. On the Toolbox Tab of the Toolspace, within the Reports Manager, expand the Parcel category and double-click on “General_Legal_Description_for_Parcels” to create a report. (Reports are generated from LandXML data extracted from a drawing. In this case, we only need the report to include data for a single parcel, so in the next step we’ll manually select the data we are interested in.)
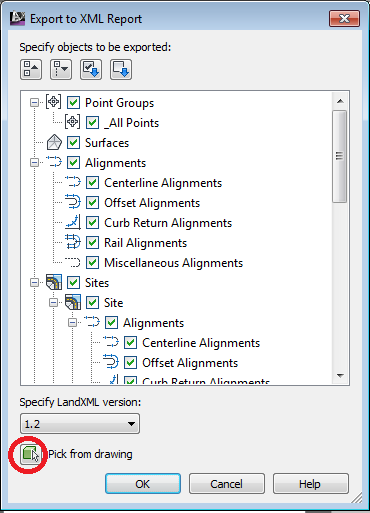
Within the Export to XML Report dialog box, click the “Pick from Drawing” button and then select the parcel by clicking on its area label and press Enter. Finally, click OK to dismiss the dialog box and generate the report.
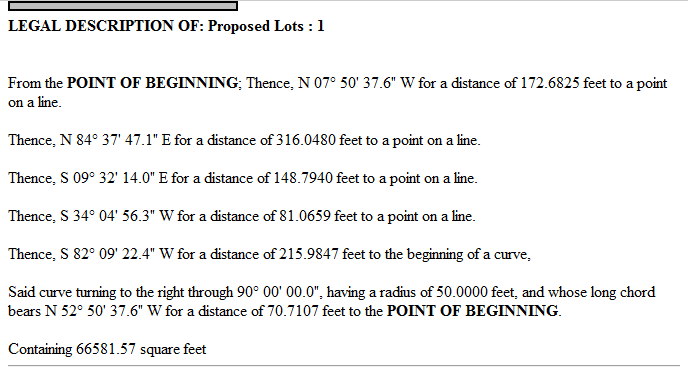
The report will be displayed within a web browser. (Note: You may have to allow blocked content to complete this task.) In the pane on the left side, click the “Append to Report” button to view the property dimensions written in a legal description style format.
As you review the report, pay note to the formatting (especially the precisions). Chances are the default settings don’t match your office standards. We’ll take care of this in the next step. For now, close the web browser and return to Civil 3D. On the Toolbox Tab of the Toolspace, click the toolbox icon in the upper left corner to open the Edit Report Settings dialog box.
From here, expand the Legal Descriptions category and make any necessary adjustments to the settings. For this example, I changed the Distance precision to 2 decimals. I also changed the precision and formatting of the bearing (Direction) measurements. When finished, re-run the report and verify the changes.

At this point you may be wondering if it’s possible to change the point of beginning used in the legal description. We can do that by visiting the Parcel Properties for this parcel.
Once again close the web browser and in Civil 3D, re-select the parcel by clicking on its area label. In the contextual ribbon tab, choose Parcel Properties. When the Parcel Properties dialog box opens, select the Analysis Tab. 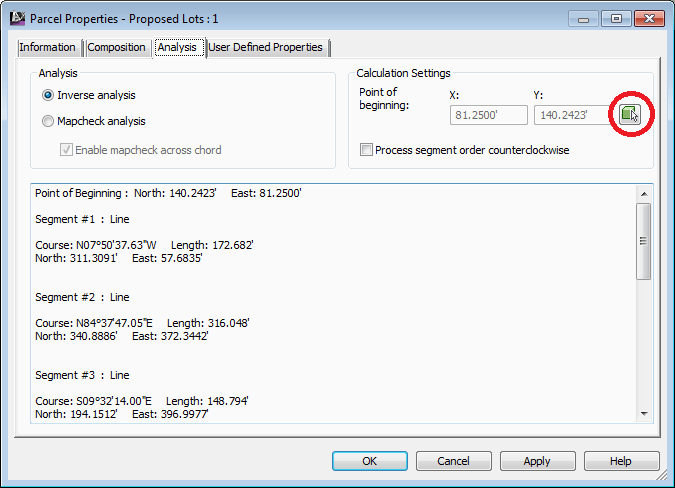 In the upper right corner of this tab, you can designate the parcel’s point of beginning. Simply click the “pick point” icon to verify/select a new location.
When finished, run the report a final time to verify the changes. You are now ready to copy and paste these measurements into a text editor where you can finalize the legal description to your liking.
In the past, creating a legal description from a CAD drawing required a great deal of verification to ensure that measurements were transposed correctly from the drawing to the written description. Using Civil 3D, (and a parcel) the majority of the text within a standard legal description can be extracted in less than a minute, where it can then be copy/pasted into the word processor of your choice.
By taking advantage of this report feature you can improve your accuracy, and greatly reduce the amount of time spent writing your next legal description.
Leave A Comment