
So you’re here for the basics of Model Coordination on Autodesk Construction Cloud (ACC) and it is a game-changer for identifying and resolving clashes in your 3D models early in the project lifecycle. Gone are the days of surprises on site, leading to costly rework and delays. This “how-to” guide will walk you through the essential steps to get Model Coordination up and running for your projects.
What is Model Coordination and Why Do You Need It?
At its core, Model Coordination is a module within ACC that allows you to:
- Aggregate models: Combine 3D models from various disciplines (architectural, structural, MEP, etc.) into a unified view.
- Automate clash detection: Automatically identify interferences or “clashes” between elements in different models (e.g., a duct going through a beam).
- Manage issues: Create, assign, and track issues directly from detected clashes, ensuring timely resolution.
- Visualize progress: See the coordinated model in a browser, making it accessible to the entire project team, even those without specialized BIM software.
The ultimate goal? To catch problems in the design phase, before they become expensive problems during construction.
Prerequisites: Before You Begin
Before you dive into setting up Model Coordination, ensure you have:
- An Autodesk Construction Cloud account: And the necessary modules (BIM Collaborate or BIM Collaborate Pro) enabled for your project.
- Project Administrator permissions: To set up services and create coordination spaces.
- 3D Models: You’ll need properly prepared 3D models from different disciplines (RVT, DWG, NWC, and IFC files are commonly supported for clash detection).
Step-by-Step Setup Guide for Model Coordination
Let’s get started!
Step 1: Activate the Model Coordination Service
Your first stop is the Project Admin module.
- Navigate to Project Admin: From your ACC project home page, click on the Project Admin icon (usually a wrench or gear).
- Go to Services: In the Project Admin menu, select the Services tab.
- Activate Model Coordination: Find “Model Coordination” in the list of services and click Activate.
Step 2: Create a Coordination Space
A Coordination Space is where your models live and clash detection happens. You can create multiple coordination spaces for different phases, levels, or even specific clash tests.
- Access Model Coordination: Once activated, navigate to the Model Coordination module from your ACC project selector.
- Click “Create Coordination Space”: When you first enter the module, you’ll be prompted to create your first coordination space.
- Name Your Coordination Space: Give your coordination space a clear and descriptive name (e.g., “Level 1 Coordination,” “MEP-Structural Clash Review”).
- Select a Folder in Docs: This is a crucial step!
- You need to choose a folder in your Docs module that will serve as the source for your coordination models.
- Best Practice: Create a dedicated folder (or sub-folder) within your “Project Files” or “Shared” area in Docs specifically for models intended for coordination. Any 3D models placed in this folder (and its sub-folders) will automatically be pulled into your coordination space for clash detection.
- Consider your workflow:
- If using Design Collaboration, you might set up coordination spaces in your “Shared” folder to automatically include models from shared packages.
- For internal team checks, you could use a “Team” folder.
- Enable Automatic Clash Detection: Ensure this option is turned ON if you want ACC to automatically detect clashes between models. This is generally the whole point!
- Click “Create”: Your coordination space is now set up.
Step 3: Prepare and Upload Your Models
The quality of your clash detection heavily depends on the quality and preparation of your models.
- Prepare Models in Authoring Software (e.g., Revit):
- Create dedicated 3D views: For coordination, create specific 3D views in your authoring software (e.g., a “Coordination” 3D view in Revit) that only include the elements relevant for clash detection. Exclude unnecessary data like annotation, details, or hidden elements.
- Check visibility settings and worksets: Ensure only the necessary elements are visible and included.
- Align models: Confirm that all discipline models share the same origin, project base point, and survey point for accurate alignment in ACC. Inconsistent alignment is a common source of “false” clashes.
- Publish Settings (for Revit): When publishing your Revit model to ACC, make sure to select the correct 3D views to be published. Each published 3D view is treated as a separate model in Model Coordination.
- Upload Models to the Docs Folder:
- Save or publish your prepared 3D models directly into the Docs folder you designated for your coordination space.
- Model Coordination will automatically process these models for aggregation and clash detection. Give it a few minutes, depending on the model size and complexity.
Step 4: Reviewing Models and Clashes
Once models are processed, the real work begins!
- Access Models: In the Model Coordination module, go to the Models tab. You’ll see a list of all the 3D models in your coordination space.
- View Aggregated Models: Select multiple models and click “Open in viewer” to view them together. You can toggle individual models on/off in the left panel.
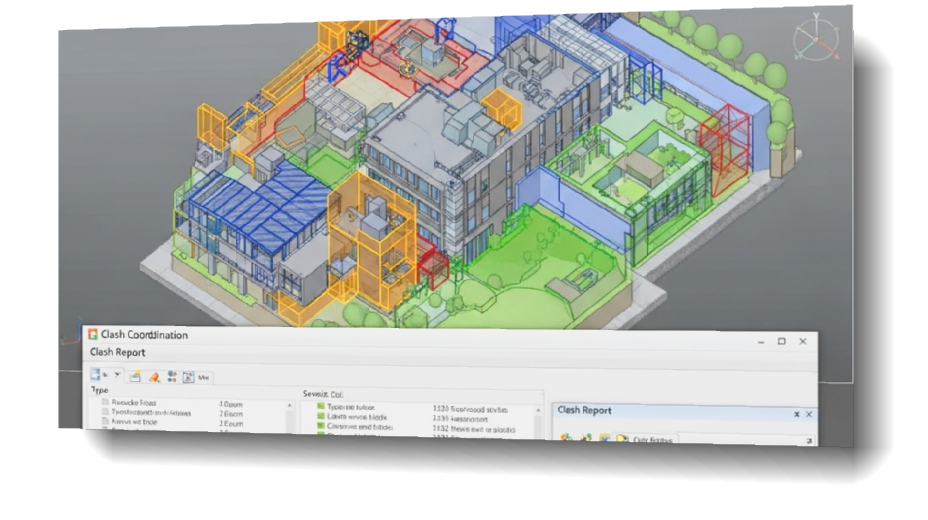
- Navigate to the Clashes Tab: Click on the Clashes tab.
- Understand the Clash Matrix:
- You’ll see a matrix showing the number of clashes between each pair of models.
- Click on a cell in the matrix to open the specific models and view the clashes in the viewer.
- Review and Filter Clashes:
- The left panel will list all detected clashes. You can group them by object, model property, system, or type to organize your review.
- Use filters to narrow down the list (e.g., show only clashes with a certain tolerance, or between specific objects).
- Create Issues from Clashes:
- When you identify a valid clash that needs action, select the clash(es) in the viewer or the list.
- Click “Create Issue” to log it.
- Fill in issue details:
- Title and Description: Clearly describe the clash.
- Status: (e.g., Open, In Review)
- Assignee: Assign the issue to the relevant team member responsible for resolving it.
- Due Date: Set a realistic deadline.
- Root Cause: (Optional, but good for analysis)
- Location: Pin the issue directly in the model.
- The issue will then be tracked in the Issues module, allowing for full lifecycle management.
Step 5: Managing Views (Optional but Recommended)
Views allow you to save specific combinations of models and their display settings, making it easy to revisit particular coordination areas.
- Create a Custom View: While in the Model Coordination viewer (with models open and filtered as desired), click “Save View” at the top left.
- Name Your View: Give it a meaningful name (e.g., “Level 2 HVAC vs. Structure”).
- Set Privacy: Choose whether the view is “Public” (viewable by all project members) or “Private” (only by you and administrators).
- Access Saved Views: Go to the Views tab in Model Coordination to access your saved views.
Best Practices for Effective Model Coordination
- Consistent Model Preparation: Ensure all teams follow agreed-upon standards for model origin, coordinate systems, and content inclusion.
- Granular Coordination Spaces: For very large or complex projects, consider creating multiple coordination spaces (e.g., per building, per floor, or by major system) to manage model size and clash results.
- Regular Uploads: Encourage disciplines to upload their latest models frequently to the designated Docs folder to ensure ongoing, up-to-date clash detection.
- Clear Naming Conventions: Use consistent naming conventions for your models and views to make navigation and identification easier.
- Focus on Actionable Clashes: Not every overlap is a critical clash. Focus your efforts on identifying and resolving clashes that would truly impact constructability, safety, or performance.
- Leverage Issues: The issues functionality is critical for closing the loop on clash resolution. Ensure clear assignments, due dates, and regular follow-ups.
- Integrate with Navisworks (if applicable): For advanced clash detection scenarios or large models, Navisworks still plays a vital role. The Navisworks Coordination Issues Add-In allows you to link clashes from Navisworks directly to ACC issues.
By following these steps, you’ll be well on your way to leveraging the power of Autodesk Construction Cloud’s Model Coordination to improve collaboration, reduce costly errors, and ultimately deliver projects more efficiently. Happy coordinating!
![]()
Leave A Comment