
Every user has a preference on how they use AutoCAD. Preferences from how the screen looks, to how the drafting tools display, to which tool palettes are displayed, and more. In this blog, we are going to take a look at some ways to customize the way the display of AutoCAD looks within the User Interface, some of the drafting settings that are customizable, and some other user preferences that can be set up to the user’s liking.
Below are some steps to customizing the way your drafting tools and a few other settings display inside AutoCAD. Be sure to check out the video at the end of this blog for a walk through of some of these options as well.
I. Drafting display settings in Options dialogue box
Several settings to set up how the drafting tools display are located in the Options dialogue box. To open up the Options dialogue box, choose one of the 3 ways as listed and shown in the images below:
- Type in OPTIONS, or even just OP in the command prompt, and hit enter on your keyboard.

- Select the ACAD symbol in the upper left hand corner of the screen & select the Options button.
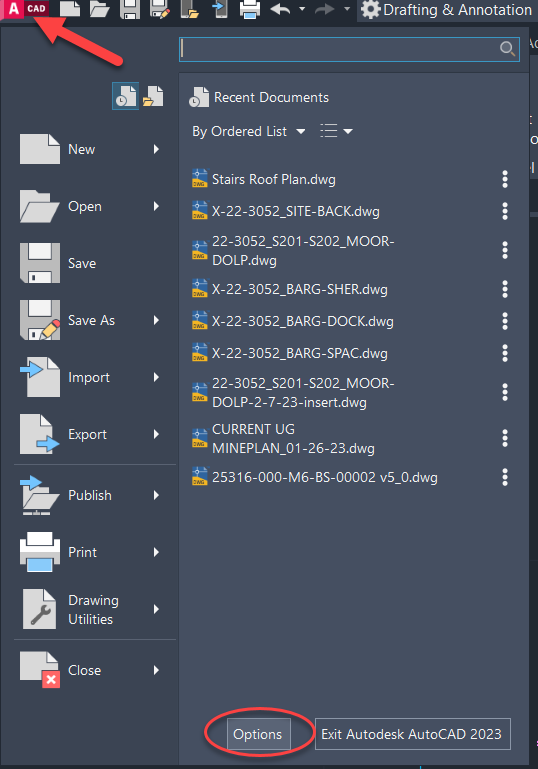
- Select the View tab in the ribbon and click the arrow on the Interface panel.

This will open up the Options dialogue box, where there are several tabs to take a look at and customize the AutoCAD experience for the user. Some of the drafting settings that affect the display are located within the Display, User Preferences, Drafting and Selection tabs.
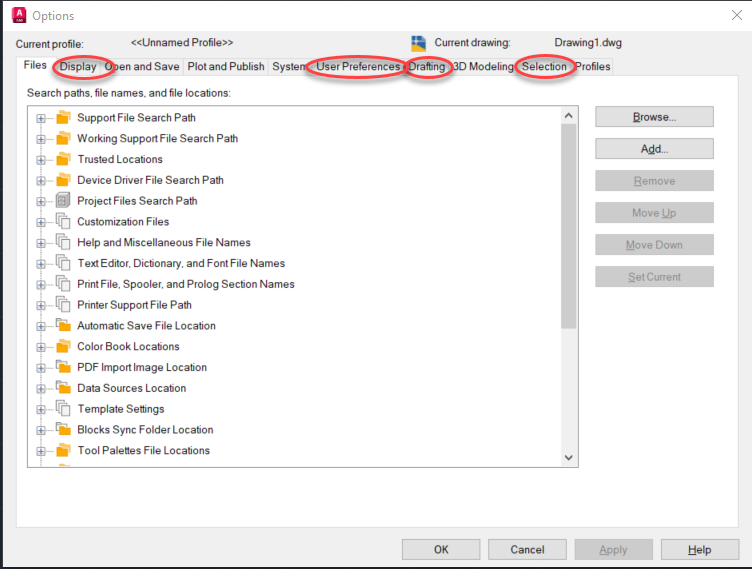
1. Display tab
A few of the drafting display settings to customize inside the Display tab (for more and specifics about those listed below, please see link above or the video at the end of this blog):
- Color theme: Dark or Light. By selecting the drop down arrow for the Color theme, there is the choice to change the theme from Dark to Light. This changes the Ribbon, Quick access bar, Model & Paper space tabs, and the overall use of the program to a light gray/white vs the drak gray/black, which is the default when opening AutoCAD.

- Crosshair size: To change the size of your crosshairs, simply slide the blue button across the bar shown in the image below.

- Colors & Fonts buttons: To change the Color of many parts displayed, and also change the Fonts displayed in AutoCAD.
- Colors: To change the Color of just about anything displayed inside of AutoCAD, select the Colors button. This allows changing the color of several drafting tools displayed in AutoCAD, including the model space background, paperspace background, grid lines, drafting tooltips, plot preview, and more. It also shows a preview of what the selection would change, and how it would look once changed for easy user interaction.
- Fonts: This changes the Command Line fonts to a different font, style and size (with limitations).

2. User Preferences tab
A few of the drafting display settings to customize inside the User Preferences tab (for more and specifics about those listed below, please see link above or the video at the end of this blog):
- Lineweight Settings: Selecting the Lineweight Settings button allows the lineweights to be viewed inside AUtoCAD at the thickness chosen, rather than view them all at 0 as the default setting. By checking the box marked Display Lineweights, the thickness will be viewed on screen.

- Block Editor Settings: Several settings inside the Block Editor Settings button can be changed to different colors, fonts, and other values depending on the user’s preference.

3. Drafting tab
A few of the Drafting settings to customize inside the Drafting tab (for more and specifics about those listed below, please see link above or the video at the end of this blog):
- AutoSnap Marker & Aperture Size: To change the size of your AutoSnap Marker or Aperture size and how it is displayed on your screen, simply slide the blue button across the bar shown in the image below.

4. Selection tab
A few of the Selection tab settings to customize inside the Options dialogue box: (for more and specifics about those listed below, please see link above or the video at the end of this blog):
- Pickbox size & Grip size: To change the size of your Pickbox or your Grips and how they are displayed on your screen, simply slide the blue button across the bar shown in the image below accordingly.

- Grip Colors: Select the Grip Colors button to change the colors of how the grips display after selecting an object on the display screen.

II. Windows and Palettes can be docked, hidden, off or floating
There are several windows and palettes within AutoCAD. Some may need to be visible all the time, others may only be needed once in a while. To help the user set up these windows and palettes specifically for their needs, there are options to dock them permanently on their screen, to have them open when you hover over the edge and roll the menu out when needed, or to have them hidden. Below are some examples of different windows and palettes and their options.
· The Command Prompt Window is commonly docked at the bottom of the display screen for easy access to type in commands and see the next step prompts inside certain commands.

· Many palettes are available inside AutoCAD. These palettes can be helpful to have access to directly on your display screen as you work. One of those pallets is the Properties Pallet where you can view the properties of individual elements and in some cases, manipulate and edit those properties
Recap
- There are many settings inside AutoCAD that can be modified to change how the user views the User Interface and other elements displayed inside AutoCAD
- Several settings can be found inside the Options dialogue box, under the Display, User Preferences, Drafting, and Selection tabs.
- Other Settings can be manipulated directly from the User Interface by turning options on from the ribbon, or manually moving and docking certain windows and pallets.
_____________________________________________________________________________________________
Talk To Me Goose
Feel free to let us know the good, the bad and the ugly in the comments below!
We’d love to help you learn more about how these tools can simplify and support your workflow! Reach out to us here and we can chat about your needs, company needs, or the classes we offer along with any customized training we might be able to guide you through and strengthen your business.
Have any questions about this blog or any other CAD related content? –> Email us at CADTechnical@seilerinst.com or call direct at 636-923-2662
Want more of Seiler Design Solution blogs and updates? Be the first to be notified when we send out updates or publish a blog that could have just what you’re looking for here! If you want to get other news from Seiler Design Solutions, sign up for our Newsletter!

Impressive upgrade! The enhanced AutoCAD templates offer a streamlined design process with consistency and customization options. A great improvement for AutoCAD drafting. Well done!
You can also refer: https://shalindesigns.com/blog/cad-drawing-improves-the-quality-of-architects-and-engineers/